Wednesday 22 June 2011


Here’s the low down on how to do these party cookies!


~ How to make Margarita shaped Cookies ~


1. Outline the cookie with white thick consistency icing (think traditional toothpaste consistency), using a #2 tip.

2. Fill in the stem of the glass with white flood consistency (about the consistency of corn syrup, or shampoo), using a #2 tip. Fill the top portion of the glass with "Margarita", using flood consistency light green icing. Set cookie aside and allow to dry fully (6-8 hours, or overnight).

3. When the base icing is fully dry, add a line of thick consistency white icing around the rim of the glass (as shown above), and then immediately sprinkle with white sanding sugar. Shake off excess sugar, then allow cookie to dry (about 2 hours) before packaging.


~ How to make Lime shaped cookies ~

(also could be adjusted for lemon or orange slice cookies)


1. Outline the cookie in a green moderate consistency icing (somewhere between thick and thinned).

2. Fill in cookie with light green flood consistency icing.

3. Immediately dd white lines with a medium/flood consistency icing.

4. Add green dots for seeds, and drag a toothpick from the middle of the dot toward the center of the "fruit" just a bit to create a seed shape.

Saturday 18 June 2011

Beach Ball Pillow


Where might you put a beach ball pillow you ask? Well, depending on the color palate you choose it could easily find a home right on your living room couch!

One that I made ended up on my daughter's bed, and is just the thing to make her room feel a bit more summery.


So let's start with fabric selection shall we?
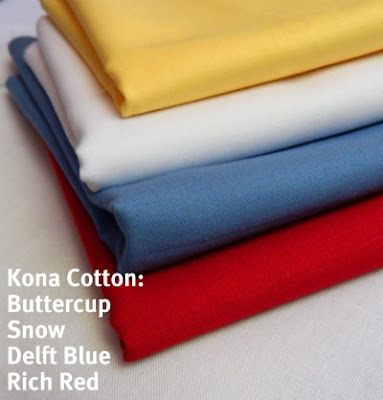
My tutorial today is for the traditional beach ball - made with the nautical colors of white, red, white, blue, white, yellow.

I choose some lovely Kona cotton solids.

I had never sewn with Kona cotton before, and let me tell you - it makes a difference. The practice pillows I made don't look nearly as nice as the Kona ones - I've been converted. I love them. So - if you want a little more pizazz than the traditional nautical color palate - you can choose either of these rainbow palates:

But really, beach balls can be made in any combination of colors - I even made one in different shades of pink!
So now that you've chosen your fabrics, you'll need 1/3 yard of each color.
Here are the other supplies you will need:
Scissors
Pins
Sewing Machine/Thread
1 bag of polyfil
Needle/Thread
In this tutorial, all seams are 1/4".

Step 1: Print out the free pattern. I suggest printing it onto a sturdy piece of cardstock. Line the straight edge up with the fold on your fabric. Pin the pattern to the fabric securely, and cut around the pattern.

Cut out 6 pieces. Three white, one red, one blue, and one yellow.

Step 2: Pin one white piece and one red piece right sides together.

Using 1/4" seam, sew along the pinned edge, removing the pins as you go.

Step 3: Press the seam towards the red piece.
This will prevent the red from showing through the white once you turn it.


Step 4: Pin another white piece to the other edge of the red.

Sew along the pinned edge.

Again, press the seam towards the red piece.

Step 5: Set what you've sewn aside and sew the remaining blue, white, and yellow pieces together. Remember to press the seams towards the blue and yellow pieces.
You should now have two halves for your beach ball.


Step 6: Pin the two halves right sides together - making certain you line up the top and bottom.


Leave about 5" of the bottom unpinned. This is the opening you will use to stuff the pillow.

Step 7: Sew around the pinned edges, remembering to leave the opening for stuffing. Clip fabric in each seam allowance right up to the seam (but not through it). This will help your pillow curve gracefully.
Turn your pillow right side out, now you are ready to stuff!

Step 8: Stuff your pillow so that it is nice and full. It will take quite a bit of stuffing since it is a sphere.

Step 9: Close the pillow using a simple blind stitch. Begin by bringing the needle up through the blue fabric.


Then down into the white, behind your first entry, and then back up through the very edge of the blue.

Continue doing this until you have closed the entire opening.

Step 10: Cut out 4 white circles with a 2 1/2" diameter. That is exactly the size of a 12 oz Mason Jar, so that's what I traced.

Stitch two circles together, all the way around.

Clip the seam allowance. Then cut a slit in ONE layer of the circle.

Turn the circle right side out and press. Repeat with the other circles.
Pin them onto the top and bottom of your pillow.

Using a blind stitch again sew the circles onto the pillow.


Decorative Stopper

Martha Stewart Living, June 2001http://www.marthastewart.com/268937/decorative-stopper
3.25625
Rated
65.125100(13)

This article is courtesy of www.chatelaine.com


Photo
Photo by Michael Alberstat

White-sangria jellies

Published by Chatelaine on 6/1/2011
5/5
(1)

Ingredients

  • 1 bottle fruity white wine, such as gewürztraminer or riesling
  • 2 envelopes unflavoured gelatin powder (7.2 g each)
  • 2 tbsp granulated sugar
  • 2 cups white-grape juice
  • 1 cup strawberries, sliced
  • 1 cup blueberries
  • 1 cup raspberries
Add to Grocery List
  1. Pour wine into a medium saucepan and set over medium-high. Bring just to a boil, then remove from heat. Whisk in gelatin and sugar until both are dissolved. Then stir in grape juice.
  2. Divide fruit among 6 250-mL glasses or Mason jars. Pour in wine mixture. Refrigerate until set, about 3 hours.
  • Prep Tip:

    Replace white wine with 1 1/2 cups white-grape juice and 1 1/2 cups water for a kid-friendly version.
How to: Set up an at-home bar


Serve up swanky drinks at your next soirée with a well-stocked bar. But, please, no juggling à la Tom Cruise in Cocktail on your first go!

Before you invite you invite guests over for a few brews and cocktails, you'll need to make sure your bar's fully stocked. Below are some of the items you'll want to have on hand for whatever the drink or size of spill.


Glassware
• Martini (for its namesake and other fruity concoctions)
• Highball (for mixed drinks, sodas or beer)
• Tumbler (for single-spirit drinks served on the rocks)
Wine (narrow bowl for white and wider for red)

• Jiggers
• Cocktail shaker and strainer (some shakers come with a strainer built in) • Stirrers
• Corkscrew and bottle opener
• Zester
• Muddler (mojitos, anyone?)
• Ice bucket and tongs
• Small knife and cutting board (for fruit)
• Manual juicer
• Blender (to make drinks worthy of paper umbrellas)
Napkins and a few tea towels (to mop up spills)

Alcohol
• Vodka (the base for many mixed drinks)
• Gin (it was good enough for the Queen Mum!)
• White rum
• Tequila
• Red and white wine
Champagne (who needs an occasion to celebrate?)
• Beer

Mixers
• Tonic and soda water
• Cola
• Ginger ale
• Juices (orange, pomegranate, grapefruit, cranberry, Clamato)

Garnishes
• Olives
Cherries
• Celery
• Mint leaves
• Sugar (for rimming)
• Lemons and limes (for zesting or juicing)

ENJOY!

Upcoming Party Excuses!!

June 19
Father's Day

June 19
National Martini Day

June 20
Wimbledon Tennis begins today (June 20 - July 3)

June21
First day of summer

June 22
Stupid Guy Thing Day

June 24
UFO Day

June 27
Happy Birthday to You Day

Styrofoam Japanese Kokeshi Doll

We’ve been thinking about the children of Japan lately and wanted to dedicate today’s craft project to them. We made a cute and simple Kokeshi Doll out of Styrofoam shapes.
Project Time: 45 minutes - 1 hour plus drying time
Skill Level: Easy ages 8+, younger with help

Materials Needed:

  • Styrofoam shapes such as round, cone and/or egg
  • Coating for Styrofoam such as gesso or molding clay
  • Acrylic paint and brushes
  • Craft glue or hot glue with glue gun
  • Pins
  • Felt, fabric, ribbons, foam, stickers for accessories

Directions:

  1. You will need a round styrofoam shape for the head and either a cone or egg shape for the body. Kokeshi dolls are known for their oversized round heads and either oval or cone-shaped bodies with no arms or legs.
  2. If using a cone shape, cut the bottom of the cone so that the size is proportional to the head. You can use any size head and body as long as they look proportional.
  3. If using an egg shape for the body, press the bottom of the egg down on a flat surface. Styrofoam easily molds so you will be able to flatten out the base.
  4. When the base is flat, it should stand on its own.
  5. Check the size to see if the head and body are proportional. Note, later you will use a toothpick to attach the head to the body and secure with glue. For now, do not glue the head to the body.
  6. Styrofoam has a porous surface. You’ll want to cover it so you can decorate the face. You can paint with gesso.
  7. Or you can use molding clay such as Crayola Model Magic Molding Clayto cover the foam head. If you are using fabric to cover the body, you only need to cover the head with coating of your choice. If you are planning to paint the base, you will need to cover that surface as well.
  8. Let dry overnight.
  9. Now add the hair. We used the molding clay. You can also use yarn or paint.
  10. After the clay is dry, paint the hair black.
  11. Decorate the face. Paint eyes and add a mouth. We used a tiny heart of self adhesive eva foam, but you can use felt, paint or even beads.
  12. Attach the head to the base. Put a toothpick in the bottom and add a small amount of craft or hot glue, then push the head onto the base. Let dry.
  13. Now you can decorate with whatever materials you have around your house. You can use any scrap fabric, real silk kimono fabric or felt. Accessories can include felt or foam flowers, butterflies, beads, stickers and ribbons.
  14. Wrap the felt or fabric around the body. Secure with hot glue or pins.
  15. Add an Obi Sash with ribbon. Secure with decorative pins.
  16. Add Accessories with glue and pins.
  17. Fix any paint, trim fabric and apply finishing touches until you are satisfied.
CD Note: Donate funds to help the children of Japan.